Upcoming Topics!!
I have lots of various upcoming topics planned, so please stop by often or better yet, follow me on Facebook and subscribe to my blog! All the wonderful support is greatly appreciated and I send it all back to you as well! :)
3 years!?! aka 6 years….

(Draft from 2020) In all honesty, since March 2017, when I posted my Chapstick tutorial – that was one of the many planned posts and video’s I had for ya’ll in cyber land.
However – life and laziness got in the way and I let this space go more dormant than any bear could ever handle, even though I still continued to pay the yearly domain fees, which completely shows that I wasn’t ready to just throw in the towel just yet.
So here I sit – 2 months shy of the culmination of 2020 – thinking of how can I reboot Natural Mommas and kick it into high gear like I’ve wanted to do for so long? However, I’m not sure how much longer will I put off my wish list for what I want to share here in this space? Why am I procrastinating so much?
While I certainly wish I had these answers off the top of my head, the one thing I do know is that I’ve got to either throw in the towel and sell this domain or truly commit and see where that takes me.
Because in the end – let’s face it – blogs are quickly becoming a thing of the past. Text is boring – videos and other visuals are all the jazz. However, we, the smart ones, know that this is only a recipe for disaster for the future of man kind, so how can we help??
One must always keep at the front of their mind – that – wait….what was I thinking about? Where’d that thought go?!?
I digress….
(Fast forward to 2023) The draft from 2020 was referring to last post in 2017 and now it has been 6 years!?! I still feel this way but the auto-renew just happened so I’m going to give this 12 months because I have nothing to loose.
My plans are simple – I’m going to start fresh and share what I’ve learned about choosing more natural choices, the products and people I have learned from, maybe a homemade recipe or two, and I’m going to sell a few products of my own!! 🙂
Now I must attempt to venture through the many changes that wordpress has made, which I never graduated past level 1 in the first place – wish me luck….
Summer Time – Natural Mommas style!
Over the last year I’ve had a few new things I’ve created and tried – Hand sanitizer spray, bug spray, and the latest – SPF chapstick!
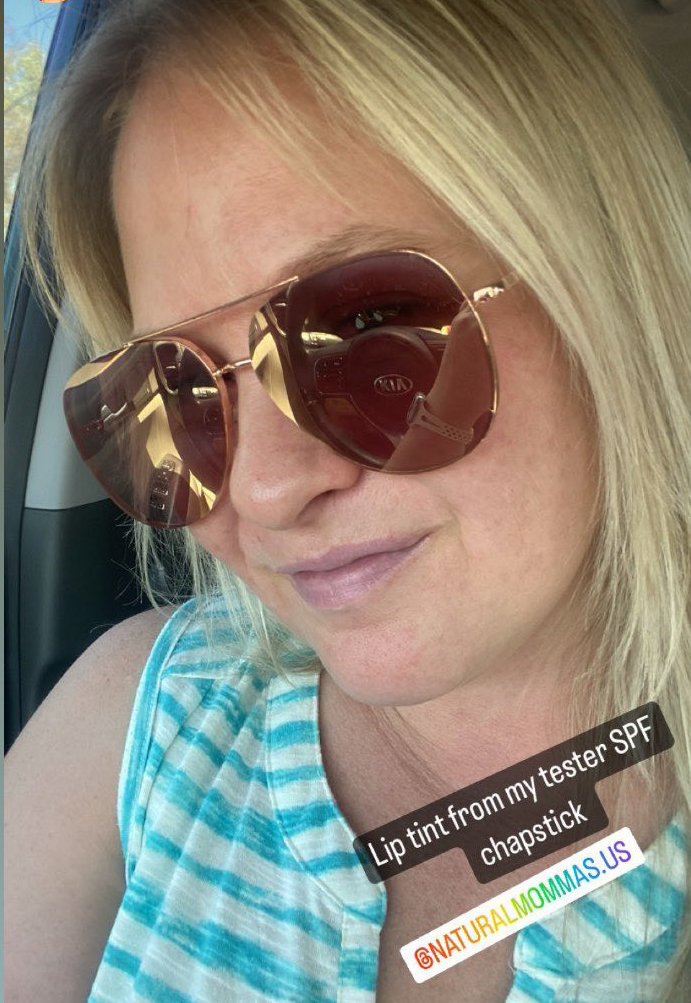
If you may not know already, I’m a huge fan of Burt’s Bee’s products – especially their original chapstick.
Since making my own version of Burt’s Bees chapstick {see here}, I have now expanded to include some sun protection by adding zinc oxide, a natural substance that helps fight the sun’s UVA/UVB ray’s.
Since making and trying this SPF chapstick, I am IN LOVE! It turned out greater than expected and is the perfect companion if you’re headed out into the sun. Be aware as this chapstick will add a slight pinkish tinge to your lips, which is from the zinc oxide, to help protect your sensitive skin. (I tried to make this image smaller but technology won!)
Another natural SPF product I’ve made and used is a Sun Stick – which is applied similar to lotion sunscreen, but just in a stick form. So it’s essentially a gigantic chapstick that you smear on your skin on the high-hit sun areas then rub it in and let your skin do the rest.
Is this microphone still working…?
I’m not really sure where to go from here on this blog and am contemplating if the yearly expense to host the domain is even worth it at this point. For a few years I was telling myself that I had to hold onto the domain because if I want to sell my products, it was best to have the domain. However, now that life has shifted into a new chapter, I’m thinking of retiring this site. But then today I was scrolling through the blog and I’m actually really impressed with myself of how much I really put into this site at one point! There’s a LOT of well written content and I’m really proud of myself for doing that, all while raising a baby! *pats self on back*
I have some topics I can still write about but not sure this is where my passion is still. I love writing but the blog at the time was my avenue to share the knowledge I was learning in my parenting journey. Even though I’m very much still a parent, it’s a different chapter of parenting.
As I sit here, I just keep thinking that I’m typing this for no reason because it will just become another draft and I won’t revisit the site for another 2 years and repeat. Last time I attempted to draft something was 2020 and it was similar to this one today – 2 years later.
It was a good run while it lasted – thanks so much for taking the time to read and stop by! It’s much appreciated! 🙂
Step by Step DIY Video Tutorial about How to Make Chapstick
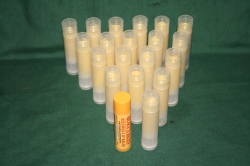
I’ve briefly mentioned on the subject of making chapstick ‘here’. Since then I’ve perfected my own art of making chapstick and wanted to show you all how easily it can be done!
This is the first of many DIY video tutorials from Natural Mommas. Here I’ll show you the basics of how to make chapstick! After watching this 2 minute video, I promise you’ll be inspired to try it for yourself too!! Please share this with others about how truly easy it is! And I promise, your lips will thank you too!!
A HUGE Thank You goes out to United We Stand Productions for the outstanding production and assistance with this video!!
Now here’s the low down on how to make the chapstick – from what’s needed, to the measurements, and step-by-step instructions.
Supplies needed:
Pot for boiling
Steel/Metal Bowl for mixing
Dropper (disposable is best)
Empty Chapstick containers with caps
Rubber binder to hold containers together
Ingredients:
1 Tbsp. Cocoa Butter
2 Tbsp. Coconut Oil
2 Tbsp. Sunflower Oil
1 1/2 – 2 Tbsp. Beeswax
8 Drops Vitamin E Oil (or 4 tablets worth)
Pea-sized drop of Lanolin
4 Drops Rosemary Essential Oil and 8 Drops Peppermint Essential oil
Tips:
–> For a smoother, more oily chapstick (usually preferred for cold fall & winter months) – reduce the amount of beeswax. For a firmer, and longer-lasting chapstick (usually liked for warm summer weather) – add more beeswax, could be up to double the amount.
–> Use 3 parts carrier oil to 1 part beeswax (minus the ‘butters’ from the calculation since they are solid at room temperature). If too soft, just re-melt and add more beeswax. If too hard, add more oil after re-melting.
–> General idea regarding how much essential oil to add – about 2 drops per container – so add at your discretion (less is better) depending on what essential oils used and preference.
Instructions:
- Over medium heat, boil water and melt the cocoa butter, coconut oil, sunflower oil and beeswax in a bowl. Stir well until all melted.
- Turn off the stove but leave on the burner.
- Add a few drops of vitamin E oil, a pea sized drop of lanolin and stir into mix.
- Lastly, add the essential oils and stir until mixed in.
- Then test a small bit on your lips or skin to ensure it is what you’d like.
- Add the mixture slowly into your empty chapstick containers with the dropper. Continue this until all out of mixture.
- Put caps on chapstick containers, then move to the freezer to allow to settle and harden well.
- Remove from freezer and voila – your very OWN chapstick!
Did you enjoy Natural Mommas’ first DIY video tutorial?? I’d love to hear from you! Please don’t forget to share with others and subscribe today!! You won’t want to miss the upcoming DIY videos to be shared soon 🙂
Thanks again for the continued support and love!!
New Chapter, New Beginnings

‘Things always happen for a reason’ ‘Time heals all wounds’
Those cliché phrases we have all heard and said at some point in our lives because sometimes there just isn’t anything else to say to help them feel better.
Yet, for the person who is enduring that life change and hears these phrases, certainly doesn’t believe it at the time. However, time truly does heal most wounds. Time can either zoom right past us in the blink of an eye or time can crawl by like a sloth.
What I’m attempting to express here is that my life as I knew it, which I had built together with my fiancé – came crashing down shortly after Halloween. One morning we’re all carving pumpkins together as a family; by that evening we were on the straight path towards no reconciliation.
Since then, my life has taken more than a 180 degree turn for what I most definitely know is for the best!
I truly believe in the phrase “It all happens for a reason” and I am living through that proof! We all are!
My son, who is now 6, and I, live together with our two cats while he spends weekends with his Dad.
As these last few months have quickly passed and time is permitting a sense of normalcy again, I can truly tell myself and believe that I will come out of this a better and stronger person! In fact, I already can feel that sense of strength building but know that it certainly won’t happen overnight. “Time heals most wounds.”
I have gone through a plethora of emotions – dug deep and dark through some difficult feelings but at the end of the day, when I look at my son, that’s all I need to see to regenerate myself into the next day and beyond.
And as each day begins new, that feeling of fresh beginnings and freedom become stronger and brighter!
From here – there’s no telling what the future holds – The sky’s the limit! 🙂
I’m excited to reveal my very first DIY video on how to make chapstick very soon! Just working on the finishing touches, so please check back again soon!!
Thank you so much,
Natural Mommas Jen
Life & Time
I really want to reconnect with my blog and sharing more but whenever I sit down or have the ambition to do so, I realize how ‘far behind’ I am and then get overwhelmed and change my mind and go do something else. Terrible, I know!
But if this continues, my great blog that I’ve put many hours into and worked really hard to develop will suffer even more and I don’t want that to happen! So here I am – just to check in and say that I’m still around and I hope to share some new recipes and ideas soon!!
What I’ve been up to lately is mostly just maintaining life through the daily life tasks and never ending schedules. School for my Kindergartener started at the beginning of August and has been going well but not as good as I was hoping. My goals of creating a learning schedule and dinner meal planning haven’t quite come to fruition yet but I haven’t given up yet either! 🙂
We also added a few new members to our family: a tortoise named Waddell and a kitten named Meowsie. They were both welcomed with open arms and our other cat has adapted well to the new kitten, which we’re thankful of. It has also been fun to see our son take on a few more responsibilities around the house – now if only my hubby would figure this out too, it would be even better! 😉 (Hell, a woman can hope, right??)


So, even though my ideas for planning haven’t been fulfilled yet, I see and feel the improvement and stronger sense of together. I just keep reminding myself that bumps in the road happen for a reason and that we can make it through anything that’s thrown our way.
Anyways, thanks to all for your continued support and I look forward to sharing some great new ideas soon! 🙂
I wish you all the best,
Natural Mommas Jen
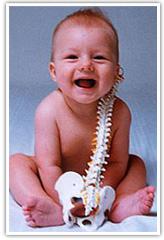
A Chiropractor can help with what?!
Here’s my experience and story behind why we chose a chiropractor to help with preventing ear infections…
When I was growing up I had the worst luck with ear infections and strep throat. I was continuously going into my ENT (ear nose throat) doctor, when finally the decision was made to put tubes in my ears. Well, the tubes never liked to stay in my ear canal where they should, so after six sets of ear tubes, I had finally grown out of needing them. The last set actually fell out one day and when I noticed it I saved it to show my Mom (who, needless to say, wasn’t very excited to this!)
However, due to the multiple surgeries, there was quite a bit of scaring and there is even a small hole in my ear drum to this day! The good news is, I haven’t had any more issues with my ears since then! 🙂
Strep throat was my second enemy, coming down with it multiple times a year. (I must say, I LOVE the delicious pink amoxicillin though!) I got strep throat so much that when we visited my Grandparents in McAllen, Texas (a Mexico border town), we would go to ‘la Pharmacia’ and pick up a few bottles of ‘amoxicillin’ to have on hand. This saved my mom trips to the doc and saved me from the dreaded strep test and that darn stick they jab down my throat – I despised that!! 😦
My very traumatized and scarred tonsils were finally removed when I was about 12, after I came down with strep again, after more than a year streak of being strep free! Since then I have rarely been sick or had strep ever again.
Once my son was born, ear infections were a fear of mine, given my history. I hoped he would never have to endure all the poking and prodding that went along with being sick all the time.
My son trucked right along developing and growing and he was rarely ever sick. He definitely is blessed with a strong immune system! I was SO thankful for this. When he finally got his first ear infection at 4, he never even complained of any ear issues at the time; it was his doctor who discovered it during his well visit.
This ear infection was determined to be THE ear infection that wouldn’t go away. After the first meds didn’t do the trick, he was upgraded to the more potent meds. As great as antibiotics are, I prefer to steer clear if possible, but we felt so desperate for the infection to just go away!

After this whole experience, I did a little digging and decided to try a different approach to helping prevent ear infections, and thus helping steer clear of unnecessary antibiotics. I had heard of some great success stories using chiropractic methods to help deter recurring ear infections in children from a Mom’s breastfeeding support group, so we checked it out. I made an appointment with a highly recommended chiropractor in our area who is great with kids.
Seeking chiropractic care helps to ensure the relationship between the spine and the nervous system are in line and functioning at full potential. Chiropractic care helps restore the normal body functions that can be thrown off when the spine isn’t in line. (There are some fancy words used but I’ll stick with my simplistic explanation.) Since our nervous system controls and coordinates all of the systems of our body, this is crucial to ensuring our body is working at its full potential.
Here’s a great general and informative article summarizing Chiropractic care and small children: A Parent’s Guide to Chiropractic Care for Children
On our first visit to see Dr. Steve (Global Chiropractic, Dr. Steven Enriquez ), he definitely noticed that Dom was ‘off-kilter’, he performed a few quick adjustments and he was all done! Dom did a great job with the whole experience. In fact, he now calls Doctor Steve, “the clicking doctor” because he makes his body click. 🙂
Children’s bodies are a lot more resilient than adults, which means fewer adjustments are needed to help kids realign the spine. (Yet another amazing way the human body works!)
He remained ear infection free for about a year, until just recently when he got another ear infection. I truly believe that had I brought him in to see Dr. Steve earlier when first noticing signs of phlegmiest, he would probably have been ear infection free. But in the end, it’s no biggie, as long as Dom is a healthy boy, we’re happy with that!
All in all, I’m glad that we sought out chiropractic help, in spite of any pre-conceived notions I previously had about chiropractic care. The experience has been great and very positive. I definitely recommend chiropractic care especially if your baby was born by C-section; is struggling with breastfeeding, has a colic, reflux, chronic infections, sleeping issues or allergic reactions. Even if none of these are issues or symptoms your child experiences, I believe there’s still many benefits in visiting a chiropractor for the whole family!
DIY Natural Hand Sanitizer
Did you know that in the U.S., a product can only be labeled as a disinfectant or antimicrobial agent after it has been registered as a pesticide with the EPA (Environmental Protection Agency)? This is why you will never see essential oils with antiseptic properties advertised as antimicrobial. (Frugallysustainable.com)
Many essential oils, such as lavender and thyme, are even more antiseptic than phenol, which is the commercial standard for the antimicrobial industry. In fact, herbs and essential oils have a remarkable ability to kill a plethora of germs, which is exactly why they’ve existed long before humans introduced all these harsh chemicals of today’s cleaners.
Using natural sources keeps the influx of resistance to antibacterials at bay and have also never been known to cause or increase such resistance like antibacterials do. Thus the reason again why natural sources like herbs and essential oils have lasted for centuries!
Herbs and essential oils are not known to cause or increase antibacterial resistance. In fact, these natural botanicals have a remarkable ability to kill a multitude of germs, which is exactly why they have been used for thousands of years in home remedies
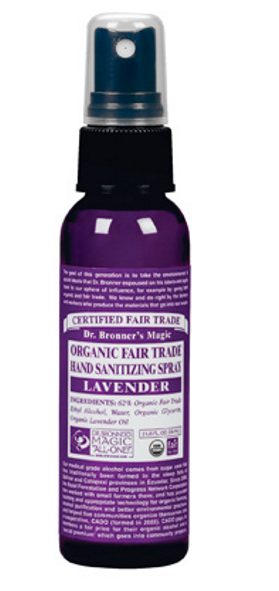
Ingredients: Rubbing Alcohol – 62% Water Glycerin Lavender oil The measurements are based on the size of spray bottle you have. I just had the original mini spray bottle from Dr. Bronners, so I used that. Directions: 1 part rubbing alcohol 1 part distilled water (recommended because of its neutral properties but tap water is fine as well) A splash of glycerin (helps moisturize to combat the dryness caused from the rubbing alcohol) A few drops of Lavender essential oil Hint: Try out the consistency and go from there. However, you really can’t go wrong here. Just keep in mind the main goal of this is for antibacterial properties, so aim for a little more rubbing alcohol if your hands feel ‘sticky’ after spraying and rubbing together. |
||||
| Are you sick of using all those ‘fake’ chemical filled hand sanitizer gels that make all these amazing promises about killing germs on your hands?
I cringe when I have to resort to such gels but I also know I won’t die from using them if necessary. But once I discovered Dr. Bronners Hand Sanitizer, I was hooked! I loved the clean feeling without that sticky residue after affect. Plus, you can’t go wrong with the smell of lavender too! In the end, we can never guarantee any hand sanitizer will kill any and all germs our hands are carrying. But at least I won’t feel as guilty using a product which doesn’t contain Triclosan. The main ingredient which doesn’t even begin to protect against viruses or fungi, Triclosan, should be avoided when soap and water are more readily available. |
||||
| Alcohol-based hand sanitizers are the best go-to in a necessary situation where washing your hands isn’t possible. But stay away from hand sanitizers with triclosan in it – save your money!
Triclosan is a known endocrine system disruptor and it’s known to amplify testosterone and possibly reduce muscle strength (found in animal studies.) It may also harm the immune system by eliciting antibiotic resistance instead of resisting. Bacteria exposed to triclosan causes further resistance to antibiotics. Studies are still being conducted by the FDA to further review possible human toxicity concerns with triclosan. So why bother with such unknown effects? Just use an alcohol-based antibacterial spray/gel to get the best ‘clean’ hands. Got dirt too? Sorry, alcohol doesn’t take care of the dirt but a little dirt won’t hurt you, right? 🙂 |
||||
DIY Natural Mosquito & Bug Repellent

Natural Mosquito Repellent Ingredients
Last fall I was invited to my cousin’s beautiful outdoor wedding here in Phoenix, Arizona. Mosquitos are rare here because it’s so dry but due to excessive rain, it caused an influx of mosquitos throughout the valley. So here this perfectly planned wedding in October was on the verge of being a mosquito fest instead. Needless to say, things ended up turning out great in the end and the crisis was averted. They ended up having a lot of citronella candles and offered bug spray to all the guests as they entered.
My cousin informed me about this issue the day before the wedding. So this prompted me to search for a natural mosquito repellent using essential oils. I then grabbed what I had available and made a small mixture of bug spray. The spray worked perfectly and we were barely bugged at all by the mosquitoes. The best part about using the natural spray was there is no nasty stinky residue stuck on your skin. In fact, I even got a few inquiries and compliments about the bug spray too.
The first try with this recipe I used DoTerra Purify essential oil and a little Lemongrass essential oil mixed in witch hazel. The DoTerra Purify blend contains Lemon, Lime, Pine, Citronella, Melaleuca, and Cilantro essential oils.
For the second try, I’m going to still use Purify and Lemongrass essential oils but this time I’m going to add Geranium and Lavender essential oils as well.
The reason for the additional oils were:
- Geranium – helps protect against ticks
(Tea tree could also be used as well or in place of Geranium, whichever you may prefer and/or have on hand)
- Lemongrass is a must when it comes to mosquito repellent – it goes hand in hand with Citronella oil.
You’ll need a bottle of witch hazel. I bought mine from Vitacost.com and it came in a 16 oz. bottle. You’ll find it at your local drug store near the first-aid section. Witch hazel is a natural antiseptic and an astringent.
Other oils which could be used are Peppermint and Cedar wood.
To Make:
- Pour witch hazel into a glass jar then add your essential oils.
- 15 drops of Purify
- 10 of Geranium, 10 Lemongrass and 10 Lavender.
- Put cover on jar and shake vigorously until well mixed.
- FYI – it’ll be cloudy looking, no worries.
- Pour mixture into designated spray bottles using a small funnel.
Directions for Use: Spray on exposed body areas and then rub it in. Keep clear of the face and eyes. If applying to a smaller child, try a small area first to ensure no reaction to any of the ingredients. You could also spray the area around where you’re sitting outside!
There’s great flexibility when it comes to this natural bug repellent and the best part, there’s no need to bathe after use unlike the chemical filled bug sprays. So enjoy this lovely natural scented bug spray the next time you attend an outdoor event.
Save yourself time, money, and your health by making this simple bug repellent!
Estimated Cost to Make:
Witch Hazel – 16 oz. – $4.59
$8 total for all oil drops – This varies in terms of costs for particular essential oils per drop, so this is a rough estimate.
If you’d like to purchase or find further information about any DoTerra Essential oil products, please visit DoTerra Essential Oils.
Coming Soon to Natural Mommas Etsy shop…stay tuned for further details! 🙂
My Saturday Rant…I’m a Total Lactivist!
So recently I’ve been surrounded by expectant mothers at my work, non the less. It actually has been pretty cool and fun. We can all joke about the, ‘don’t drink the water’ that we all hear when there’s a plethora of expectant parents at once.
But what goes on in my mind the most is what I’m really passionate about – breastfeeding. Where I work they are very adaptable when it comes to needing to take nursing breaks to pump. There’s even a separate area with a fridge and locker space too! It really is awesome and I can’t complain compared to what some must overcome in order to pump during their work hours.
If anything I just want these moms to know what would really help going into birthing a child, then feeding them your milk, and beyond. If I hadn’t found the support I had right after my son was born I doubt I would be able to say the same things I can today – that he was breastfed for the first two years of his life.
That experience was my son and I’s first lesson learned together and it was the most amazing, most worth it experience ever! And 95% plus moms can do it, if they really have the determination and support they need in order to succeed!
Just like they say, it takes a village to raise a family, this is so very true. Check out my friends post over at Whole Family Parenting about this concept and how to find your own. 🙂
Support
When I knew I was going to nurse my son from the very beginning I had this idea in the back of my mind that there’s always a bottle back up. But after having a c-section and really struggling with my son latching, I found a breastfeeding support group that met at the children’s hospital next door once a week. At the time when I was at the hospital they unfortunately didn’t have a lactation specialist but the nurses tried their best to help me. Each time he needed to nurse, I could only use the football hold because of my own healing incisions. But I was determined and because of that determination and stubbornness on my own part, I never gave in and my son and I learned to work together.
It was the best feeling ever but I wasn’t fully confident yet. So my loving mom brought me to this breastfeeding support group days after we were released from the hospital. I had the youngest baby there and was so filled with emotions from all the hormones that I just broke down crying. It was so life-changing in that moment, in that class, it all clicked for me! I got the help I thought I needed, even though it wasn’t help I needed it was encouragement knowing I was doing it right, just had to make a few adjustments. After that hour, I felt SO motivated and inspired to nurse my son. I’m sure it had a little to do with the oxytocin releasing in my brain but that’s what it’s there for. :”)
There’s something like connecting with a group of women who are experiencing similar issues and relating that really helps lift the spirit. I continued this support group once a week for about six months or more and I recommend anyone who’s wanting to breastfeed to find something similar.
We all must stick together and encourage each other through such a journey. Without such support, most will not succeed as long as they planned.
Now, I must digress here for a moment because I don’t want anyone to think that if they failed at this that they failed as a mother. They certainly haven’t! I just want to share how such support can really, truly go a long way! I gained a wonderful group of female friends whom all ended up creating an online private support group. From there it was endless; we had playdates all the time, shared best practices, vented, you name it. It truly was a saving grace! Especially because I didn’t know anyone else going through what I was, so without this support I would have been SO lost. I don’t have close relatives like most do when raising children so it makes it a whole different scope to deal with. But no matter what your village contains in the end, as long as there’s a little t-pee of a village to help, you’ll be more than grateful for it! I don’t recommend anyone trying to raise a family without a little help from friends and villages 🙂
We all must stick together – share together – cry together – whatever it may be. Without each other’s help we’re all just strangers living parallel in this crazy universe together. Why not help out when others need help? Why not share when you have nothing else to lose? When we all stick together and help each other out, this world seems a little less stranger and larger than it needs to feel!
And at that, I end my rant but I just really felt like expressing this and I thank anyone who took their own time to read it. Please share with others and be kind to one another 🙂
FYI – I have decided to not proof read this and just share this time…forgive any errors. Thanks!
 Super Baby Foods