Step by Step DIY Video Tutorial about How to Make Chapstick
I’ve briefly mentioned on the subject of making chapstick ‘here’. Since then I’ve perfected my own art of making chapstick and wanted to show you all how easily it can be done!
This is the first of many DIY video tutorials from Natural Mommas. Here I’ll show you the basics of how to make chapstick! After watching this 2 minute video, I promise you’ll be inspired to try it for yourself too!! Please share this with others about how truly easy it is! And I promise, your lips will thank you too!!
A HUGE Thank You goes out to United We Stand Productions for the outstanding production and assistance with this video!!
Now here’s the low down on how to make the chapstick – from what’s needed, to the measurements, and step-by-step instructions.
Supplies needed:
Pot for boiling
Steel/Metal Bowl for mixing
Dropper (disposable is best)
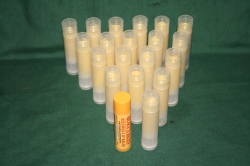
Empty Chapstick containers with caps
Rubber binder to hold containers together
Ingredients:
1 Tbsp. Cocoa Butter
2 Tbsp. Coconut Oil
2 Tbsp. Sunflower Oil
1 1/2 – 2 Tbsp. Beeswax
8 Drops Vitamin E Oil (or 4 tablets worth)
Pea-sized drop of Lanolin
4 Drops Rosemary Essential Oil and 8 Drops Peppermint Essential oil
Tips:
–> For a smoother, more oily chapstick (usually preferred for cold fall & winter months) – reduce the amount of beeswax. For a firmer, and longer-lasting chapstick (usually liked for warm summer weather) – add more beeswax, could be up to double the amount.
–> Use 3 parts carrier oil to 1 part beeswax (minus the ‘butters’ from the calculation since they are solid at room temperature). If too soft, just re-melt and add more beeswax. If too hard, add more oil after re-melting.
–> General idea regarding how much essential oil to add – about 2 drops per container – so add at your discretion (less is better) depending on what essential oils used and preference.
Instructions:
- Over medium heat, boil water and melt the cocoa butter, coconut oil, sunflower oil and beeswax in a bowl. Stir well until all melted.
- Turn off the stove but leave on the burner.
- Add a few drops of vitamin E oil, a pea sized drop of lanolin and stir into mix.
- Lastly, add the essential oils and stir until mixed in.
- Then test a small bit on your lips or skin to ensure it is what you’d like.
- Add the mixture slowly into your empty chapstick containers with the dropper. Continue this until all out of mixture.
- Put caps on chapstick containers, then move to the freezer to allow to settle and harden well.
- Remove from freezer and voila – your very OWN chapstick!
Did you enjoy Natural Mommas’ first DIY video tutorial?? I’d love to hear from you! Please don’t forget to share with others and subscribe today!! You won’t want to miss the upcoming DIY videos to be shared soon 🙂
Thanks again for the continued support and love!!
 Super Baby Foods
Love this video!
such a cool project for teenagers too!