Upcoming Topics!!
I have lots of various upcoming topics planned, so please stop by often or better yet, follow me on Facebook and subscribe to my blog! All the wonderful support is greatly appreciated and I send it all back to you as well! :)
How parenthood changed my life, myself, and beyond
Do you ever think about all the ways that becoming a parent suddenly transforms you in SO many ways you never knew was possible? And the quickness in which it all happens?!? Pre-baby my life was in a transitional phase. I finished college a few years prior and was floating around from job to job struggling to find the right fit for me. I wasn’t 100% sure about what I wanted to do as a long-term career but I felt I was on the right path, given the tough economical times our country was enduring. So I was just enjoying life and taking it all in, seeing what all the world had to offer. I met a bunch of fun new friends along the way and was loving life!
I met my fiance at a popular local watering hole (bar) one weekend before the holidays and we instantly connected. From there our friendship turned into a more serious relationship and the rest is history. We were living together with another couple for about three years before we ended up getting our own place together because we discovered we were pregnant! Even though it wasn’t a planned pregnancy per se, we had discussed our future life together and knew we wanted to be together for a long time. And from there, the rest is history! 🙂
 D arrived into this world and transformed our lives for eternity! He’s been such a blessing in countless ways! Becoming a mom changed me in many positive ways. I was headed down a very unhealthy path in life before I got pregnant but after D was born my life path was re-directed in countless positive ways! I often wonder where my life would be if I never had a baby when I did but then I realize it doesn’t matter either way – I love where my life is currently at and the promising future it bestows me. My life now is overwhelmed with SO much love, happiness, and a sense of fulfillment – it’s perfect! They say that things happen for a reason and it’s very true – they do. I feel like D was brought to this earth to turn my life path around and I wouldn’t change a thing. 🙂
What’s Changed for Me
There’s endless things that have changed about my life and myself since D being born but some of the major changes are: eating healthier and becoming more conscious about what I use on my skin, and making my own products to use as well. Another major change is the fact I have a lot more local friends, most of which are moms too. Of course I could go on about all that’s changed about my life since becoming a mother but I’ll stick with a few major ones worth sharing.
The first homemade products I made was laundry detergent and dishwasher detergent. I was SO surprised at how EASY and CHEAP it was to make them and I haven’t bought laundry detergent or dish detergent in two years and LOVE it! (At $.01 per load, you can’t beat the price and savings!) From there, I have made my own liquid hand soap, eye make up remover, herbal facial astringent, bathroom cleaner, all purpose cleaner, and the list is ever changing. I also changed to a natural deodorant two years ago and wish I done so a long time ago! DIY products are my new passion and I LOVE it! 🙂
1. Homemade Products
Once I learned about all the thousands of chemicals we put on our skin daily and the top chemicals/ingredients to avoid, it was hard to continue using brand name products knowing the harm it causes to my body. Check out this alarming factoid: “More than 10,000 ingredients are allowed for use in personal care products — and the average woman wears 515 of them every day, according to a 2009 British study that looked at the routines of over 2,000 women.” [http://www.lesstoxicguide.ca/index.asp?fetch=personal] So each day, we’re slopping on over 500 chemicals on our skin, which is the largest organ in the body – Pretty alarming! Check out that site for further details about certain tested chemicals to steer clear of, very informative.
So when I was pregnant my mom was actually the one who bought me this lotion that was paraben free and had no artificial colors. When I asked her why I should use that lotion instead of the Bath and Body Works lotions I was using at the time, she said that all those chemicals in lots of lotions seep through the skin and are shared with the baby as well and aren’t good for our bodies in general. Parabens actually are used in many products as a type of cheap preservative and have also been found in many breast cancer tumors too. So, even though the link between the two has been found, no direct links have been scientifically established or proven yet. So after learning about Parabens it sparked my interest and from there has ballooned into a passion for me. My mission is to eventually use only homemade products. I’ve learned SO much in a short two year time span about natural cleaners, toiletries, and remedies to make and use in place of the ones most households use and I’m always learning more! D’s babysitter, just by random chance, is also into homemade remedies as well so we’re always sharing our latest discoveries – it’s a lot of fun.
We’ve also saved a LOT of money as well by making our own cleaning products, toiletries etc. and made our house chemical free, for the most part, too. So D’s barely been exposed to any harsh cleaners like Mr. Clean floor cleaner for example, that emits chemicals in the air when used that aren’t good to ingest anyways. I only use water and vinegar to clean the floors, counter tops and other surfaces and it works just as good as the expensive brand name cleaners (and 10 times cheaper too)! (I could go on and on about this topic so I will stop myself there and write about this further in another future post. 🙂 ) When I did a quick Google search I stumbled upon this informative page that covers a wide array of topics when preparing for a baby in your house, check it out here.
2. Healthy Eating
I have also changed my eating habits too. I wasn’t a huge junk food eater previously but now I care a lot more about what I’m eating and feeding D. So I try and steer clear of heavily processed foods now and buy/eat organic produce as much as I can. I follow the dirty dozen list for the most part to eliminate the heavy chemically treated produce like strawberries (only buy organic) and buy regular produce if the skins are thicker (less seepage of chemicals into produce).
 I wanted to make sure that D was raised with healthy eating habits from the start. So to do this change I had to start with myself first. I tried my hardest to eat healthy as he quickly grew so my breast milk was filled with lots of good nutrients. I also made all of D’s food from the first bite he ever ate. (Read more about that here in a previous post I wrote about this subject matter.) It was a lot of work but totally worth it! As he’s gotten older we still do our best to feed him wholesome foods but sneak in a few treats once in a while. 🙂
I think this has been my area of constant struggle because I still want to reach for junk food but as long as I keep it out of the house then I don’t eat it. The whole idea of “out of sight, out of mind” holds the most truth in eating healthy and keeping that up. But I can feel the difference if I don’t eat right and I love the feeling of eating healthy, so it’s worth the extra time to eat healthy and pass that onto D.
3. Making more friends
I moved to Arizona not knowing many people and have made plenty of friends throughout college but there’s not many people I have 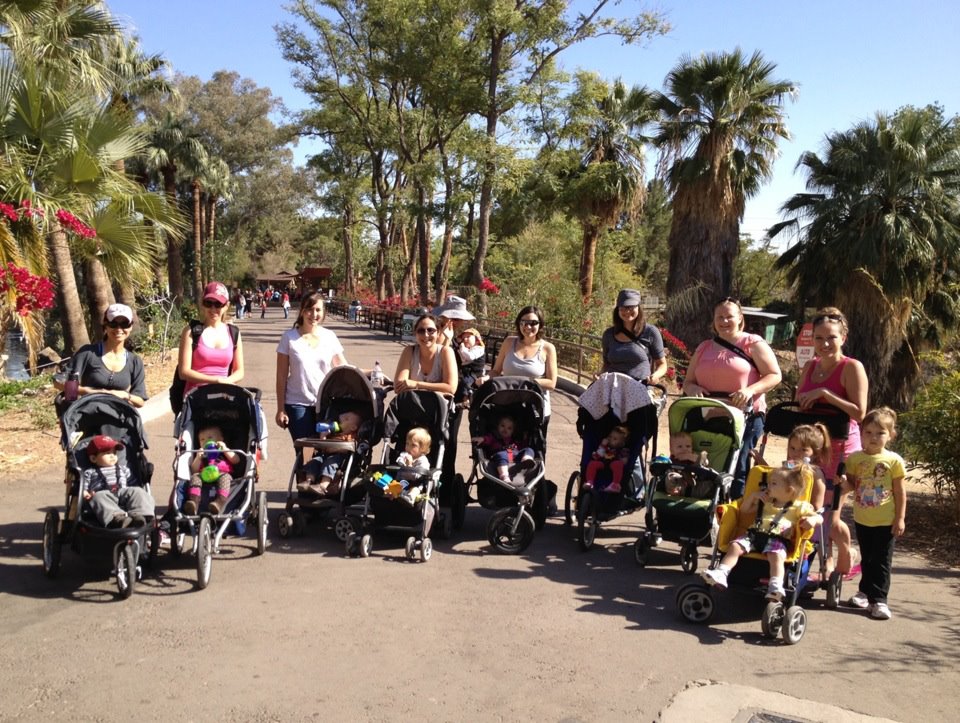 kept in contact with. I have my wonderful friends from my homeland in Minnesota which I keep in touch with, including my best friend that still lives there. But through the years, friends have come and gone in my life. So after I gave birth to D I was amazed at how many women I became friends with and clicked with quickly as well! I always struggled with keeping female friends because I just never clicked with many of them. But I met SO many great women through a local breastfeeding support group I attended and we have all kept in close contact for over two years (mostly via Facebook group). So having such a strong support base was huge and I don’t know what I would have done if I hadn’t met such great people!
So for any new Mom out there, reach out to as many moms groups, breastfeeding support groups, etc. in your local area. Keep in mind that it may take a few tries to really find a group of friends that mesh well but you’ll love having that support beyond your close nit support system.
Conclusion
All in all, I LOVE being a parent and all the fun and exciting adventures that go along with it. We all have our image of what we believe life will be once we have a child, once we are married, graduated college, moved out on our own, etc. but until we actually experience all of the amazing life events, time will only tell how life will actually be. Life is SO short, so no matter how our life unfolds, we all must remember to enjoy every moment as it is delivered to us and just go with it, trust your instinct, and don’t forget to smile! 🙂 There truly is ‘No day but Today’! (From the musical, RENT)
Household Duties – Divide and Conquer
 I’ll be the first the happily admit – I love cleaning. I always have ever since I was a wee one. My mom told me recently that I used to organize my crayons perfectly in the box before coloring. I find it to be rewarding when I clean, as well as keeping my life organized (for the most part). I’m the type of person who loves to make to-do lists; sometimes I’ll even make to-do lists for to-do lists. There’s something rewarding for me each time I’m able to scribble off another task off my list. And then there’s always those few items on the to-do list that never go away for whatever the reason may be (usually because it’s least liked task to do). So when it comes to household duties I am the queen at delegating tasks. There are certain chores which I prefer to do because I’m a little anal about them and/or enjoy doing them (laundry for the most part). I have my own method to my madness for laundry and I don’t want my chi messed with, so I am the primary launderer in our household. 🙂
The primary reason that I do the laundry, besides the fact I enjoy doing laundry, is that my significant other thinks the more soap he uses per load the cleaner the clothes will get (he seems to have this habit with any type of soap used). For example, when he washes dishes I’ve seen him squeeze about a half dollar coin size or so of dish soap onto the sponge just to clean two plates that require minimum scrubbing in the first place! And then the sponge is SO engulfed in suds and doesn’t get rinsed out enough and then by the next day it is stinky, gross, and ruined. Definitely a huge pet peeve of mine (and I’m sure many of you as well)!
BUT I digress…What we have found that works best for keeping up with the household tasks is organization via to-do lists and charts. Every week or so I will start a list of things that need to be done around the house for hubby to do. Then anything and everything else is completed by me. This system seems to work best (kinda) for us but like anything there’s always room for improvement. However, a to-do list is only helpful if the tasks are completed in a timely manner. My hubby is the king of kings of procrastination (or laziness?), whichever term used, in the end it’s all the same. I have to nag and nag and remind and bug him to make sure things get done. I could go on about this topic for days so I’ll halt myself there. 🙂
It’s tough to keep the house in working order while also trying to entertain and raise a kid(s) at the same time. Now granted, having just one kid is FAR more easier than adding one or more into the situation but even just raising one child is tough enough for most people (like me). But whether it’s one or three kids, it’s still one tough job, that’s for sure!! I was a stay at home mom for the first year and a half of my son’s life and I loved it (most days) but wanted to poke my eyes out other days while hiding in the closet plugging my ears. 😉 Now that I have returned to work full time, it adds a whole new spectrum of organizational skills needed in order to keep on top of house duties and beyond! Even now after working for six months, I still feel like I’m trying to find a good balance within my life’s areas. But I definitely have to keep reminding myself that no matter how dauntingly long my to-do list may be, spending time with my toddler and hubby is number one! I only get one chance to enjoy each stage of my son’s life and I would hate to some day look back and regret missing milestones because I was too pre-occupied with menial tasks, etc. Living in the moment, especially while being a parent, is so crucial yet SO difficult to remember during those rough patches.
Here are a few tips from what I’ve learned thus far in my attempts to keep up with all the household duties and beyond, in order to have a happy and healthy household. Please feel free to share you’re tips and experiences as well below for others to learn from as well. 🙂
Tips for survival:
* Prepare, plan and pack what you can the night before.
* Make a detailed list of all household duties – from daily tasks to regular maintenance and yearly deep cleaning – and hang it by the household calendar for reference.
* Write out your grocery list and other household items list for shopping and STICK TO IT! With a little planning and preparation, grocery shopping can be less stressful and cheaper too! Check local ads for the best deals and sales before shopping and bring your coupons too!
* Delegate duties to your significant other as well and don’t shy away from doing so. Being the best cohesive team you can be together is HUGE and will make life SO much more easier. Communication is key.
* Make sure that within the weekly schedule, there’s also time for just free time fun. Life’s too short, don’t cut it any shorter! 🙂
* Children are sponges for learning and LOVE to help, so involve them and teach them tasks which are age appropriate to help you out. It’s never too early to give them a few responsibilities to help out around the house.
* Use technology to your advantage and find applications which help with tasks and to-do lists, etc.
Please feel free to share any of your tips, tricks, and/or advice that you may have in the comments below! Thanks 🙂
Couponing 101
 I’m sure you’ve all seen or heard of the TLC show “Extreme Couponing,” where it showcases people who go to the extremes to get deep discounts using coupons. Well, I’m not going to explain how you can achieve this but I am going to give a few pointers on what’s been successful for me since I started seriously couponing about a year ago.
It all started when my friend invited me to a Coupon Sense informational meeting where you learn how to use their website to get deep discounts using coupons and store sales. I learned a LOT from the meeting and signed up for a discounted trial month. I ended up barely using their website and just wasted my money (which wasn’t much but every penny counts when it comes to saving)! I quickly discovered within my trial month that there’s a plethora of FREE sites which offer the exact same thing, sans the monthly $14 service Coupon Sense offered. So after canceling (and dealing with their terrible accounting department which continued charging me after canceling), I was pretty fed up with them, to say the least! I couldn’t believe that first off, people pay for this and second off, THAT PEOPLE PAY FOR SOMETHING THAT’S ALREADY FREE!!! Long story short – don’t pay for a service to match coupons with sales when there’s plenty of free ones already available online – do a little research before forking over a monthly subscription.
I live in Arizona so for anyone who is local, check out www.thecentsableshoppin.com. She’s local, matches all the weekly grocery stores, drug stores, and large stores like Target and Walmart, for yup you guessed it – F.R.E.E.!! She also posts a variety of different deals going on, which is really handy if you follow her on Facebook too. I’m all about supporting local so I mainly seek her blog for deals first.
Some other sites I really like are www.raininghotcoupons.com, thekrazycouponlady.com and www.totallytarget.com. There’s also blogs just for the organic type, www.organicdeals.com and www.survivingthestores.com. The list goes on and on but these are my top favorites by far! Of course there’s always the main ones to retrieve the coupons like www.coupons.com, www.smartsource.com and www.redplum.com. Also, don’t forget to sign up to get deals from your favorite brands’ websites and follow them via social media too!
Here’s a few general tips about printing coupons online:
1. Never pay to print coupons.
2. Only 2 of the same coupons are allowed to be printed per computer IP address (in most cases).
3. Set your printer settings to low quality, quick print, black and white to conserve ink.
4. Try and use the most out of each piece of paper too – print multiple coupons, not just one and when necessary keep extra paper cuttings for scratch paper.
5. Create a separate e-mail account just for couponing so that way you can keep your personal e-mail box personal.
In terms of how to organize your ever growing coupon collection, there are endless ways to do so. For me, I’m a visual type of person, so I chose a binder method using baseball card protective sheets. Some like to categorize their coupons in a large shoe box or updated organizer bin. I also picked up an inexpensive paper cutter for when I’m cutting mass quantities (via staple to keep each stack of congruent coupons together).
Since I have a busy toddler I went with the prepare before you leave the house with all needed coupons and leave the binder at home method. Then I will organize my coupons into sections of the store with my list that coincides. I also carry around a mini coupon organizer for every day items I just might happen to find an unexpected deal when shopping. As he’s getting older it’s becoming a lot more fun to involve him in our shopping trips by holding onto the list or something which makes him feel involved, maybe even rewarding him with a treat! He loves cars so we usually go to the grocery stores that have the extended carts with a car attached, he’s in his glory as am I. 🙂
A friend of mine categorizes her binder in accordance to how her local grocery store aisles are set up. One other method is to cut out the coupons from each insert (or skip the cutting til needed), place in a zip lock bag, and label which insert/date their from so that way when pulling coupons based upon the blog your following so it’s easy to locate. Whichever method works for you, go with it!
As long as in the end you’re saving money (and time) by getting items when their on sale and at their deepest discount, then all is well on the wallet front. 🙂 Just be careful because it can get addicting getting things for free or discounted greatly! I know there are certain things which I will never have to pay for again – toothpaste, dental floss, body wash, etc. The list goes on and on! (However, now I’m becoming more frugal by making my own toiletries and cleaning supplies, as mentioned in my homemade cleaning series I, II, and III.)
I would love to hear how you save money while grocery shopping or any other fun information we can all learn from! Please share below and thanks for reading! 🙂
What’s for Dinner??
 The ever dreaded question in our household – “what’s for dinner?” There’s an ongoing debate in our house as to what’s for dinner, who’s cooking and who’s cleaning up. My friend has a cute blog called “Family Dinner” with some fun stories about family dinner, craft projects/gifts, family values, Montessori teachings, etc. Please check it out for some thoughtful and fun ideas!
I’m not a good cook at all. I knew very minimal pre-baby and have learned a LOT in the kitchen since! One of my biggest challenges is what to make from what I already have (for the most part). Well thank goodness for the invention of the internet, where there’s endless recipes and ideas – all for FREE! I started with a folder of different recipes I’ve tried with success or want to try but as my experience and creativity grew, so did my folder. One day while I was visiting a friends’ house, she showed me what she does with all her recipe print outs, which is genius! She puts each recipe in sheet protectors within a binder, so that way while she’s cooking that recipe she can just simply wipe off any unwanted gunk and then put the recipe back in the binder. I did this and I LOVE it! Nothing better than being able to customize my own recipe book with all my favorite recipes and ones I want to try!
We also recently got a family iPad so that’s been helpful in the kitchen too. Awhile back I downloaded a bunch of free recipe books from Amazon.com onto my Kindle (there’s always free books to download, check it out!) but it doesn’t have a touch screen so navigation can be difficult and frustrating at times. However, with the Kindle app on the iPad, I’m able to quickly access recipes I’ve bookmarked and have a stand which holds up the iPad as I’m cooking too! It’s another perfect way to cook delicious dishes quickly and easily!
In terms of the actual process of dinner, our rule in the kitchen is the one who cooks doesn’t have to clean. So for us it’s simple – I cook, hubby cleans and vice versa. I find that sticking to easy recipes with fewer than 5 main ingredients works best. I won’t give a recipe more than 5 seconds when browsing if the list of ingredients is more than half a page – just not worth it. I also look for healthy substitutions whenever possible as well. And if I can double the recipe for left overs, more power to it!
I think it’s just as difficult to be a stay at home mom dealing with nightly dinner duties as it is to be a working mom. Preparation and meal planning is key to survival! Find a little time to sit down together before each week begins and plan out meals, life will be a LOT easier! Plus, it’s a great way to practice communicating with each other and exemplifying to your kids these important assets too. 🙂  Even getting the kids involved in the whole process when their of appropriate age is perfect too! A family working with a budget will greatly benefit from meal planning, along with using coupons and sales at your local grocery store when possible! There are some excellent blogs and websites which offer coupon and sale matching, which can save lots of time too! (Check out my post about couponing.) My favorite local blog is www.thecentsableshoppin.com, she’s amazing and always has the latest sales up with matching coupons. Also, utilize your local farmers market for all the fresh ingredients for the week! Nothing tastes better and is best for you than locally grown, delicious veggies, fruits and much more!
I hope these ideas are helpful. I would love to hear some of your ways you keep dinner upbeat, fresh, and exciting! 🙂
Capturing Memories – Making a Time Capsule
 There are endless ideas of how to capture the past to one day share with future generations. From paper, to digital, to
  online archiving and beyond! When my son was just a few weeks old we created a cement stone with his feet imprints (easier said than done). We also captured a 3-D version of his foot and hand with a mold and that turned out to be the neatest thus far! I made a shadow box that has his coming home outfit and other various newborn items. I’ve also been doing a monthly footprint too and plan to create something from that as well. However, one of my major ongoing projects has been creating a time capsule of memories which we plan on sharing when little man is an adult (probably as he’s finishing high school before leaving for college).
Back around my son’s first birthday a friend of mine mentioned the idea about making a time capsule and I loved the idea! I started shortly after that and still have yet to consider the project completed. I’m still waiting on a few people who are procrastinating terribly on writing a letter to him, then I can put the box away in storage to be forgotten about for a long while. I’m not making the type of time capsule that you bury in the ground – just a plastic bin that I’ll eventually tape or seal some how (just in case anyone finds it and gets curious).
What I’ve included in the time capsule thus far are:
- Letters from Mom, Dad and other close family & friends
- Various memorabilia from his first year, like his receiving blanket, hospital bracelet, rattle, shoes, ultrasound pictures (on disc), decorations from his 1st birthday, etc.
- Coins minted from his birth year
- Birthstone (I haven’t decided how I’m going to include this yet…)
- Various items from the past like his Dad’s craft project from when he was little, a magazine from his Great-Great Grandma, pictures of Mom and Dad when they were munchkins – the list in endless!
- Newspaper/Magazine clippings from around the time when he was born
- Definition of his name, zodiac sign, birth stone, etc.
- Hand/Footprint laminated
- Predictions of what he’ll be when he grows up (created by attendees of his first birthday party)
- Current Technology and trends from year of birth
- A collection of pictures which were displayed at his birthday party
- Birth plan & story
- Family tree (our family is too small and confusing but I may include one eventually)
- Slideshow on DVD (will include once I figure out how to make one!)
 And I’m sure I’ll find other items to include over time. I’ve had a lot of fun creating and thinking of fun things to include knowing that someday we’ll (hopefully) get to watch him discover the time capsule and go down memory lane together! It’s also the perfect way for the Grandparents and other family to share their own memories too.
I’ve also created a table of contents containing brief explanations of the items included. With regards to the personal letters, I had each person seal up the letter in an envelope and label the outside. Since the letters are so personal, I wanted each person to know that whatever is contained in the letter is personal between the two of them. I’ve had to write some pretty difficult papers in my life but nothing compares to writing a letter that will be read far in the future yet not knowing if you’ll still be alive! (I know it’s morbid but being a parent doesn’t make you exempt from the reality of life’s ultimate event.)
There’s only so much one can commemorate from childhood so a time capsule is the perfect way to pass on and share items in one place. I’ve also ensured to keep on top of his baby book, as well as various online archives and hard discs of photos [as mentioned in previous post – Pictures]. I’m sure most would think I’ve gone a little overboard but he’s my first (and only, thus far) so I find it to be quite therapeutic for me as well. 🙂 Have fun with it and be creative – you can’t go wrong!
What are some fun ways you’ve captured your child(rens) memories through the years?? Please feel free to share below, thanks! 🙂
Pictures – how I organize, store and share them!
") In our ever evolving technology-based world we live in, there are endless ways to store, share and take pictures. On our son’s first birthday I realized I needed to get an external hard drive for multiple reasons but mainly because I had over 32 gigabytes worth of videos and pictures from just his first year of life! 32 GB!! Now this included plenty of HD videos, which are pretty large files, as well as an overwhelming amount of digital pictures. Even though I wasn’t using a DSLR camera til after he turned one, which taking pictures in RAW also quickly added on to the gigabyte usage. So I solved this by getting a 2 terabytes external hard drive! Who knows how many years of pictures and videos I’ll be able to store with that much memory – all I know is that it’s a LOT of space – hopefully more than enough space for many years of photos and videos to come. 🙂
In our ever evolving technology-based world we live in, there are endless ways to store, share and take pictures. On our son’s first birthday I realized I needed to get an external hard drive for multiple reasons but mainly because I had over 32 gigabytes worth of videos and pictures from just his first year of life! 32 GB!! Now this included plenty of HD videos, which are pretty large files, as well as an overwhelming amount of digital pictures. Even though I wasn’t using a DSLR camera til after he turned one, which taking pictures in RAW also quickly added on to the gigabyte usage. So I solved this by getting a 2 terabytes external hard drive! Who knows how many years of pictures and videos I’ll be able to store with that much memory – all I know is that it’s a LOT of space – hopefully more than enough space for many years of photos and videos to come. 🙂
Some ways that we’ve captured memories without sacrificing our wallet is to take our own photos. For his newborn photos we just set up a little studio in a room where there was lots of natural light, hung plain fleece fabric up and had a few extra hands on deck too. We didn’t have any special high-tech equipment, just a regular point and shoot digital camera. We also did some searching online to find some ideas for poses for the photo shoot and the end product was just perfect!


In terms of sharing photos with friends and family, the easiest way is to find a free online picture archiving and sharing service like Shutterfly, Photobucket, Flickr, Snapfish, etc. where you have endless choices of what you can do with your picture collection. I chose Shutterfly because I was already familiar and comfortable with their online setup and found it easy to use. Shutterfly also offers endless products to showcase photos and always has specials! They also offer a sharing site you can set up yourself where your friends and family have access to whichever pictures you choose to share and can even order prints for themselves! (A little secret – if you’re looking to save money printing photos – check out all the above mentioned sites and create multiple accounts – they’re always offering free x amount of photos for new members!) 🙂
") Such photo archiving sites are also a perfect way to have a backup of all your photos too – which in this day and age, you’ve got to be vigilant in backing up everything in more than just one place! I also create discs of photos and videos every few months and store them in our fire safe security box. I’m not going to take any chances loosing priceless, one of a kind memories! And don’t just assume that whatever hardware you have won’t crash on you, because it will – it comes with the territory of modern day technology.
Such photo archiving sites are also a perfect way to have a backup of all your photos too – which in this day and age, you’ve got to be vigilant in backing up everything in more than just one place! I also create discs of photos and videos every few months and store them in our fire safe security box. I’m not going to take any chances loosing priceless, one of a kind memories! And don’t just assume that whatever hardware you have won’t crash on you, because it will – it comes with the territory of modern day technology.
In terms of video storage and sharing, I just use YouTube. When I discovered that I can post videos AND control who can view them (private or unlisted option) I stopped looking any further. Besides the ability to control personal settings on each video, I can also upload videos taken on my phone directly to my YouTube account too! The easier it is for me to keep up with videos, share with others, etc. in the least amount of time, I’m all for it! It’s already a full-time job to keep up with photos, videos, D’s blog and my own projects on top of my many other responsibilities!
With regards to ways of keeping up with all the cell phone photos too, I use Google Picasa (not the actual program, just the online portion linked with my Gmail account. Since I have an Android based phone which utilizes Google applications such as Gmail, I simply upload the photos to my Picasa site and then save them to my computer from there. Best idea ever! Picasa is also another great way to store, share, and organize your photos online and on your computer via the downloaded program (free).
![]() The one site I kept from mentioning is the ever obvious Facebook site. Of course this is a great way to share photos with friends and family but lots of people are vigilant about doing so, which is completely understandable. Just ensure that you understand and use the security options. Whichever method you choose to store, organize and share your photos, always keep in mind how your child is going to feel in the future about these pictures being online. It’s your child’s privacy at risk too, so don’t share any photos that could be used later in their life against them for whatever reason (ie. naked baby photos, etc.).
The one site I kept from mentioning is the ever obvious Facebook site. Of course this is a great way to share photos with friends and family but lots of people are vigilant about doing so, which is completely understandable. Just ensure that you understand and use the security options. Whichever method you choose to store, organize and share your photos, always keep in mind how your child is going to feel in the future about these pictures being online. It’s your child’s privacy at risk too, so don’t share any photos that could be used later in their life against them for whatever reason (ie. naked baby photos, etc.).
")
There is one other technology which is pretty new but quickly becoming the norm is “cloud” technology. This essentially saves your specified data in your “cloud” so you can access it remotely from any device, anywhere, any time. You’re data is essentially stored in a server. I don’t really know much about this new and upcoming technology as it’s just a little too far out there for me (personal preference) but keep this in mind as another possible option for your pictures and other data.
I hope this post wasn’t too much information. This was a topic which I never thought about when having a child so I wanted to share my personal experience and how I organize, store and share our family photos. Please comment below if you would like to share any additional information that I didn’t cover.
Healthy Foods & Snacks On The Go
 As your little one becomes more apt to various foods and eating more textured items, going out on the town to run errands and what not requires a little more preparation. When my little guy was just starting to dabble with finger foods we did lots of puffs. If you haven’t discovered these little gems, you’ve been missing out! Various companies now make them and their aimed towards the beginner pincher who is working on their fine motor skills and can handle bits and pieces of foods. The puffs will eventually melt in their mouth so that way the choking hazard is minimal. I will never forget the first time we gave our little guy some puffs, he kept on getting them stuck on his fingers and the back side of his hand and had some difficulty getting it into his mouth at first. But soon after that he mastered them and scarfed them right down! They were like baby crack when you brought out a container during a play date – you were suddenly the life of the party. 🙂
Along with puffs, another food I always brought with was a banana and sometimes an avocado. Those were simple items that didn’t require much preparation and were easy to administer (and allergy free, in case we were out with other kiddos). I would just cut up the avocado, put it in a bag and/or wrap it in tin foil (to keep it from changing color) and bring a spoon to feed the little man when he’s hungry. The other go-to snack item was cheerios! I know their not the most nutritious but they kept a kid happy and bought you some extra time at the grocery store. 🙂
 I found some small to-go containers at a local store and would use them to pack little snacks when I knew we would be gone for a longer period of time. They were perfect to pack in the diaper bag and easy to access by babies hands as well as mommies. We also picked up a few of those snack cups that have the easy to access tops but not as easy for the contents to fall out. One of the best investments we’ve made with regards to food utensils; we still use them! Their the perfect cup for on the go but watch out because once the top is used a few too many times – good luck keeping anything inside the cup, especially if your little one figures out that when shaken it makes noise (and the contents slowly falls out)!
The best way to cut up finger foods, I found, was by using a pizza cutter! It’s the easiest, quickest way to cut something up into finger food portion sizes! I wish I could remember where I read/heard this tip – best tip ever! As great as a knife works, a pizza cutter is so much quicker, more precise and not as sharp in case your little one is near by.
") The other kitchen item I used a BUNCH when I made finger food recipes was the mini muffin tin. I made so many things using this muffin tin as my mold – quinoa bites, muffins, a snack tin that had various foods in each compartment, and much more!
The other kitchen item I used a BUNCH when I made finger food recipes was the mini muffin tin. I made so many things using this muffin tin as my mold – quinoa bites, muffins, a snack tin that had various foods in each compartment, and much more!
I also would use measuring cups with handles lots once little man got a little older and was walking around more. I found them to be the perfect cup that he could transport his snack to where he wanted and munch away. He now will come into the kitchen and know exactly where the cups are and ask for one. So, check out what your local dollar store has – their the perfect go-to snack cup when your at home!
There are a gazillion recipes and blogs out there for making delicious, healthy finger foods for your wee ones. Some of my favorite go-to blogs are wholesomebabyfood.momtastic.com and blog.homemade-baby-food-recipes.com. There are a bunch more places to find some great recipes but these two always had some excellent finger food ideas and recipes! So check them out and please share any other resources you have found in the comments below too! 🙂
Another favorite way I got my little guy excited about his food was make a smoothie – it’s easy, you can sneak anything you want into it, and they’ll LOVE IT! I also would take the left over smoothie and pour it into Popsicle molds to save for a cranky, teething day. It was the perfect go to snack that would help keep him entertained AND help soothe his gums from his pain from teething! I found some cheap molds at IKEA but I’m sure any local grocery store or dollar store has some Popsicle molds – they don’t have to be anything fancy, they won’t know the difference. 🙂
The biggest thing to remember as your little one(s) becomes a little foodie is that presentation and colors are huge! So make sure you try to make an attractive presentation out of the meal and your little one will go for it that much more. The other item to keep in mind is to remember to have FUN!! Your child is experimenting just as much as you are and nothing is more fun than learning and growing together! So have fun making and feeding your little one new and different foods because soon they’ll tell you exactly what they want and then everything becomes that much more “fun”. 😉
Please feel free to share your experiences, what’s works for you, tips, tricks, and anything else for other readers to learn from. Thanks!
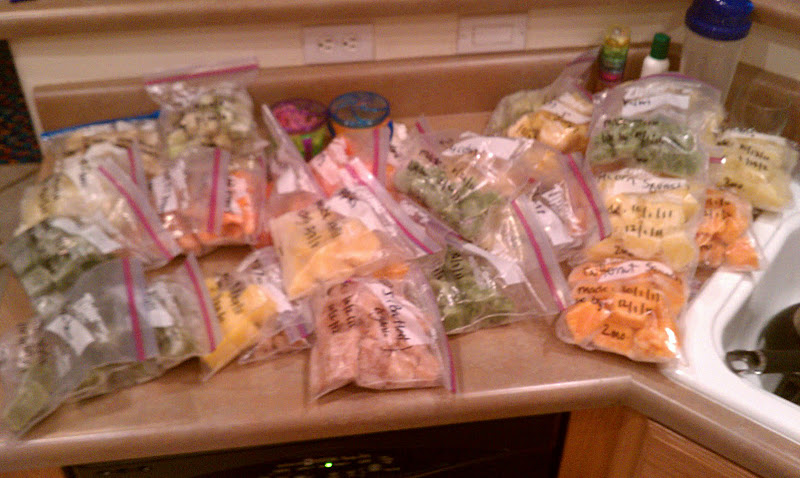
Making Your Own Baby Foods
Due to the fact that my child was exclusively breastfed, it really helped me realize how much of an influence healthy and nutritional foods are in relation to a life long positive association with food. Breastfeeding has made me very aware of what I eat because I know I’m passing on all the nutrients from my diet to my sons body. So I set out on a mission to research how to make my own baby food when D was about five months old. I knew from the moment he was a wee one that I wanted to make his baby food but I didn’t know much else beyond that. I first had read from my friends’ blog, Whole Parenting Family, how much success she had making her own baby food following the book by Ruth Yaron called “Super Baby Food.” So I ordered it and started reading it and jotting down notes! The book has a plethora of information starting from the very beginning of prepping your kitchen, safety measures to take to making baby food and delves further into other ideas as your little one gets older and your family expands. So it’s a book that I have been and will be referencing for many years to come!
 I started by finding a good food processor/emulsifier that I could use for making baby food, as well as everyday food processing as well. I followed her suggestions as to which foods to introduce first and each month following, as she has a table of foods suggested per month/age bracket as they grow. I loved having the book for quick reference throughout our baby food making adventure. She also has some great tips with regards to storing food, making batches to preserve for future dishes, ways to freeze foods, and much more. I don’t think I would have had as great of success with making my own baby food without Ruth Yaron’s help! So check her book out! (I have not been paid for mentioning or suggesting her book!)
Another great resource that I referenced lots as well online is: http://wholesomebabyfood.momtastic.com/. This site has a bunch of information about foods and when to introduce each food, recipes, tips and much more. Since making your own baby food is becoming more and more popular, there are a lot more resources and websites available which is great! There’s nothing better than giving your child a head start with good nutrition and associations with food than to feed them the real, fresh food instead of pre-packaged, processed food. Just think of the difference in flavor – have you ever tried jarred baby food? It doesn’t taste or look anything like its fresh counterpart.
1. With regards to which kind of food grinder/processor to purchase – keep in mind that if you get one specifically made for making baby food (ie. Baby Bullet or Bebea ) their going to be a lot more pricier and you won’t find yourself using it for more than a few months tops anyways). Now, don’t get me wrong – there’s nothing bad or wrong with such products – I am just a very frugal person whom makes sure that what I buy will be used lots. Also, when you’re shopping around make sure to read the reviews – their your best friend when deciding on anything your purchasing. 🙂
2. The second most important item you’ll need when making your own baby food is a steamer pot. You’ll be steaming food constantly and will use it when you’re done with the baby food stage as well (ie. steaming carrots, broccoli, potatoes, etc.). After shopping around I found a steamer insert for a regular size pot at IKEA for under $10 and it works perfectly for what I needed it for. It isn’t one that lies deep in the pot; it hangs about 1/4 the way inside but works just fine for me. When I was comparing prices for a steamer pot, it ranged from $30 – $50+, which really surprised me so I just went with the IKEA steamer tray instead.
 3. The third and just as crucial item you’ll need are ice cube trays to freeze the baby food in! The regular, good ‘ol ice cube trays work just fine, however, if you’re one that’s vigilant about steering clear of BPA, there are some great trays out there on the market made just for homemade baby food. Bebea has their own line of freezer trays, which are great since their silicone and easy to pop the cubes right out. My personal favorite is made by Green Sprouts and is totally worth the extra few dollars, in my personal opinion! Fresh ‘n Freeze also makes some great 2oz. reusable food storage containers that stack on top of each other to save room in your fridge or freezer. I loved these little containers to store small portions of finger foods as D progressed beyond mashed baby food and their also great for travel too!
4. You’ll also need some freezer storage bags to store each type of food. I ended up washing and re-using the bags once or twice too to conserve more. Most of the foods will last about two months in the freezer, which is the perfect amount of time since the baby food stage is short lived anyways.
5. Some great ways to save even more money by making your own baby food – buy fruits and veggies when their on sale and in season, buy in bulk (Costco, Sam’s Club, etc.), find a local food co-op, start your own garden, or see if there’s a near by Bountiful Baskets pickup. I LOVE to get my basket each week from bountiful baskets – if you’ve never heard about it, it’s a food co-op where you order your basket and choose where/when you’d like to pick it up. It’s 50/50 fruits and veggies of whichever is in season at the time. You get a lot of fresh produce for $15!
6. In our family, we wanted to eat better and healthier while not spending too much more on our groceries. So when it comes to buying fresh produce, I’ll only buy the organic version if it’s on the “dirty dozen” list. If you haven’t heard of this list, it includes: apples, celery, sweet bell peppers, peaches, strawberries, nectarines, grapes, spinach, lettuce, cucumbers, blueberries, and potatoes. These twelve items are known to be the most pesticide and chemical ridden of all produce, so if you are able to, purchase the organic version. For the “clean 15” list, check it out here.
When it comes to which kind of produce to purchase when making baby food – always go organic. Since your little one is so young, it’s best to try and avoid feeding them produce which is known to have high amounts of pesticides and other chemicals.
There’s an entire market now that is solely dedicated to homemade baby food products – from glass containers, to freezer trays, to baby food makers, and more – they’ve thought of it all. So just make sure to do your research online, read the product reviews, ask other parents, and compare prices to ensure that the bottom line cost outweighs purchasing pre-made baby food. Even though in the end, making your babies food is SO much better for them no matter what the price. However, with the ever increasing costs of raising a child, saving some money while making your own baby food has numerous benefits – financially and physically. In the end, you may find out that you’ll break even in terms of the costs but long term benefits are ten fold in comparison to serving pre-packaged baby food anyways! And the joy you’ll endure by serving freshly prepared food to your child’s developing pallet is priceless, rewarding, and SO worth the extra effort at the end of the day. 🙂
Top Ingredients to Avoid
There was a huge interest about making your own cleaning solutions that I wanted to include one other bit of information. Also, I have a plethora of other homemade solutions for the body that I want to share soon but first I wanted to try them myself before I recommend them. So stay tuned! Some upcoming recipes include: sugar scrub, probiotic deoderant, eye makeup remover, and a few others. I think I have found my new passion – making my own solutions for the body and house and beyond! Once I realized how easy and cheap it is to make my own remedies, it’s hard to buy the commercial counterparts again when the homemade remedies work just a good but with less long-term effects (ie. harsh chemicals, etc.). I am all about saving money while also being Eco-friendly and using the least amount of harsh chemicals on my body and my families as possible. There is definitely something said for returning back to how people used to live before all the huge companies and consumerism took over. If there are ways which I can save money AND prevent further exposure to all the chemicals to my family then I will do it, even if it means taking a little time and investment to purchase a few rare ingredients. After realizing how simple homemade cleaning and other products are to make, I will never return to paying for the overpriced, chemical filled products again! I hope you will also continue discovering new remedies to make and share them with us here! 🙂 I must thank frugallysustainable.com for your inspiration and ideas that have inspired me on my newly found adventure!
There was a recent article I had read reading the top ingredients that one should avoid in terms of their harshness and cancer-causing factors. I wanted to list them here however I am unfortunately unable to find the article again to cite for further information. So I am going to list the ingredients to bring them to your attention and hope that you look at the ingredients in the products you use to see if these are in them. Go here to search each item further so you can educate yourself about what these chemicals are doing to your body each time you apply them on your skin. Remember that your skin is one of your largest organs and it’s very important to also care for your skin as much as you care for your diet, etc. too!
Parabens
Fragrance
Oxybenzone (sunscreen)
PEG, ceteareth & polyethylene compounds (PEG-# & -eth
DMDM Hydantoin & Diazolinylured (o?)
Benzalkonium chloride
Butylated Hydroxyanisole (BHA)
Diethanolamine (DEA)
Bedtime – Routine and Persistence!
 As a parent we’re always desperate to do whatever it takes to get your wee one to sleep! Unfortunately, the rules for sleep aren’t set in stone for every child. Sleep is one of the hardest first lessons you will teach your child. From my experience and other parents I know, I would have to conclude that a lot of how your wee one sleeps follows the parents’ ways of sleep. If you are an excellent sleeper with very few issues, if any at all, then your child has a high likely-hood their sleep patterns will follow. If you have always had sleep issues and struggled, then going to sleep may be very difficult to obtain for your wee one as well. (This is just from observation not from scientific study whatsoever.) D has had his rough patches but for the most part we have been very blessed with a wonderful sleeper! In fact, just the other day he slept in til 9:30 am (went to bed at 7 pm), which is VERY rare!!
For the most part, since around 12 months or a little before, he has slept through the night, give or take about 12 hours – straight! Now if you have a wee one under the age of 6 months, it’s really hard to do much regarding their unpredictable sleep issues except tend to their waking needs. Even over 6 months, tending to their waking needs is a good idea. However, the time frame after 6 months is when lots of parents will start some form of sleep-training. After talking with some Moms and doing some research, we chose to try the “cry it out” method, as discussed by Dr. Ferber in his book Solve Your Child’s Sleep Problems. I was at my wit’s end of sanity of never getting more than 5 hours of sleep at a time and I was ready to try anything!! Now I just want to state that this is the method that worked best for our family but it may not work for your family. (I say this because the “cry it out” method is quite controversial among parents.)
Dr. Ferber has some excellent points in his book whether you are an advocate or not of his methods that I believe every parent should practice (in some form) if they want their child to sleep well. First off is routine, routine, routine! Create a simple and easy routine that can be used for bedtime and nap time, anywhere you may be – vacation, home, Grandparents house, etc. For example, for bedtime we do bath, brush teeth, PJ’s, boob, book, and bed. For naptime, we go turn the music on, boob, books, and bed. So whichever you may choose, whether it be singing the same song(s) about what your doing, a particular song that helps sooth them, reading books, closing the curtains, etc. Choose what routine works best and don’t make it too complicated or long. This routine will be the foundation for your child to know that sleep is upon them – no surprises. The reason behind having routines is because children THRIVE upon routine, even at the youngest age of 6 months, it’s how they know what “time” it is in their little worlds, so there’s not too many unexpected surprises (at least in this area of their lives). So whichever routine you find that works, stick with it as much as you can and make adjustments as need be. But whatever you do, consistency is the KEY to success!
 The second major aspect of Dr. Ferber’s method is practicing extending the amount of time going to check on your child after putting them to bed. So for example, when one starts this process, you go in after 3 minutes, sooth the child by patting their back and telling them it’s ok and it’s time to go to sleep. Then you wait 4 minutes outside the door, then go check. Then increase the time up to 7 minutes, as so on – up until they have finally gone to sleep. So eventually you may find yourself waiting 10 minutes between check ins, etc. This shows the child that you’re not abandoning them and are tending to their needs still, yet allowing them to work on self-soothing themselves back to sleep. Teaching your child how to self-sooth to sleep (and back to sleep) is one of the hugest first lessons ever and will pay off ten-fold in the end.
In doing my research regarding which sleep method we thought would work best for our family and our beliefs, we learned about Dr. Ferber and gave it a try but also discovered endless other methods people have published and written about. So if you and your significant other don’t believe in the popular “cry it out (CIO)” method, know that there are many other options to research and try instead. In the end, however, there really is no one particular catch-all method/answer and it’s all trial and error. Each method has it’s pros and cons, depending upon your families’ particular viewpoint, parenting style, and child’s’ ways. Unfortunately there’s no catch-all method, so if one method doesn’t work after trying it for a few weeks, give things a break and try another way or revisit things after some time. Just know that there’s a light at the end of the tunnel no matter what, it will just take some time and effort for both parents! 🙂
Another thing to keep in mind is that if things don’t work one time, there could be a variety of reasons, whether it’s teething, growing pains, sickness, etc. So just revisit the plan again when their not sick or teething etc. and hope that the next time things work out better and if not, try another method in a few weeks.
D has been a wonderful sleeper since a young age and we’re so very blessed and thankful for this. My heart goes out to all the parents that suffer and struggle for many months + and I hope that they’re able to find peace in the best ways to teach their child to sleep longer and better. Good sleep is such a huge factor in learning and comprehension and as we all know, without good sleep each night, other areas of our day can struggle, including learning and temper. So, as you venture down sleep training lane, please do seek out guidance from other parents and your pediatrician and keep trucking along no matter what and know that long peaceful nights of rest will soon enough occur. Persistence in whichever method/way you choose will equal success, stick to your guns, and remember who’s the teacher! 🙂
What are some tips and things that helped you in teaching your little one to sleep soundly longer? Please share in the comments! 🙂
 Super Baby Foods